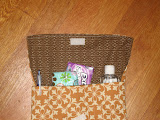
I LOVE crafting. Let me tell you, I’m NO expert, I just love working with my hands, seeing something that I created with my hands, and I love the feeling after I complete a project and it actually works! J So, I thought it would be fun to start a little craft corner on the mommy blog. My hope is that I can find and post crafts that EVERYONE can do, that are simple, in-expensive, only take about an hour, and FUN! Remember to have fun and get creative!!
This month, we’ll be making placemat bags. These are great bags that are perfect size for lots of different things. I’ve used them for gifts, my favorite is to make a little church bag out of it, add tissues, gum, a scripture marker, etc. I’ve also used them as my everyday purse, and they hold up great, plus you can have one to match every outfit.
Some tips
- place mats are inexpensive, so watch for them to go on clearance, at the end of each season.
- My favorite place to buy placemats are places like Pier 1, Marshalls, TJMaxx, and even Target!
- When you are buying a placemat for a purse, you want to keep it pretty thin and flexible, something that will go through your sewing machine easily.
- Handles can be either ribbon or plastic. You can find handles at any craft store (look for coupons!). I like the cute bamboo ones, but ribbon works just as great, is less expensive and you can also embellish with it.
- If you want to get fancy, you can add a snap or button closure…. Maybe not for beginners, but definitely easy and fun.
So, let’s get sewing!! This is the place mat I chose, it is from Macy's, cost 5$ and is a GREAT sturdy, well-made place mat. Plus I loved the colors!

First, decide how you want your handles.
And decide if you want any embellishments on your bag.
We will sew both of these on first.

After I laid it all out, I first sewed on the brown ribbon, just for an embellishment. Then I sewed on the little bow, and then started on the handles.

Here are the handles sewn on.....


Now, fold your bag inside out, or with RIGHT sides together. Line up the edges, and sew up the sides, about ½ inch from the outer edge. Don’t forget to back-stitch at the top where your bag will be opening a lot.
After the sides are sewn up, we're going to make square corners. It is easy, don’t get scared. Leave your bag inside out, hold your bag upside down and put your hand in so that your fingers (your 3rd finger) are in the corner. Now, with your other hand, pinch your bag on the seam so it makes a little triangle. Here is where you will sew; it makes it a little easier to sew if you push the seam open, like the picture below. Do the same on the other corner.


AND....fold your bag right side out, push out the corners, admire your work, and TA DA!!! You are done! Now, fill it with all sorts of goodies, post a picture and let us all admire your fabulous crafting!! We want to see everyone's unique styles and different ideas, so please post a picture of what you did!!
To see more examples from other contributors click here



 Posts
Posts