THIS MONTH ON MOMMY DIARIES

Ingredient of the month: Cream of Chicken Soup

Do you want to be our newest author? Click here!

Showing posts with label one hour craft. Show all posts

4.19.2010

One Hour Craft - Plate stand/cake stand

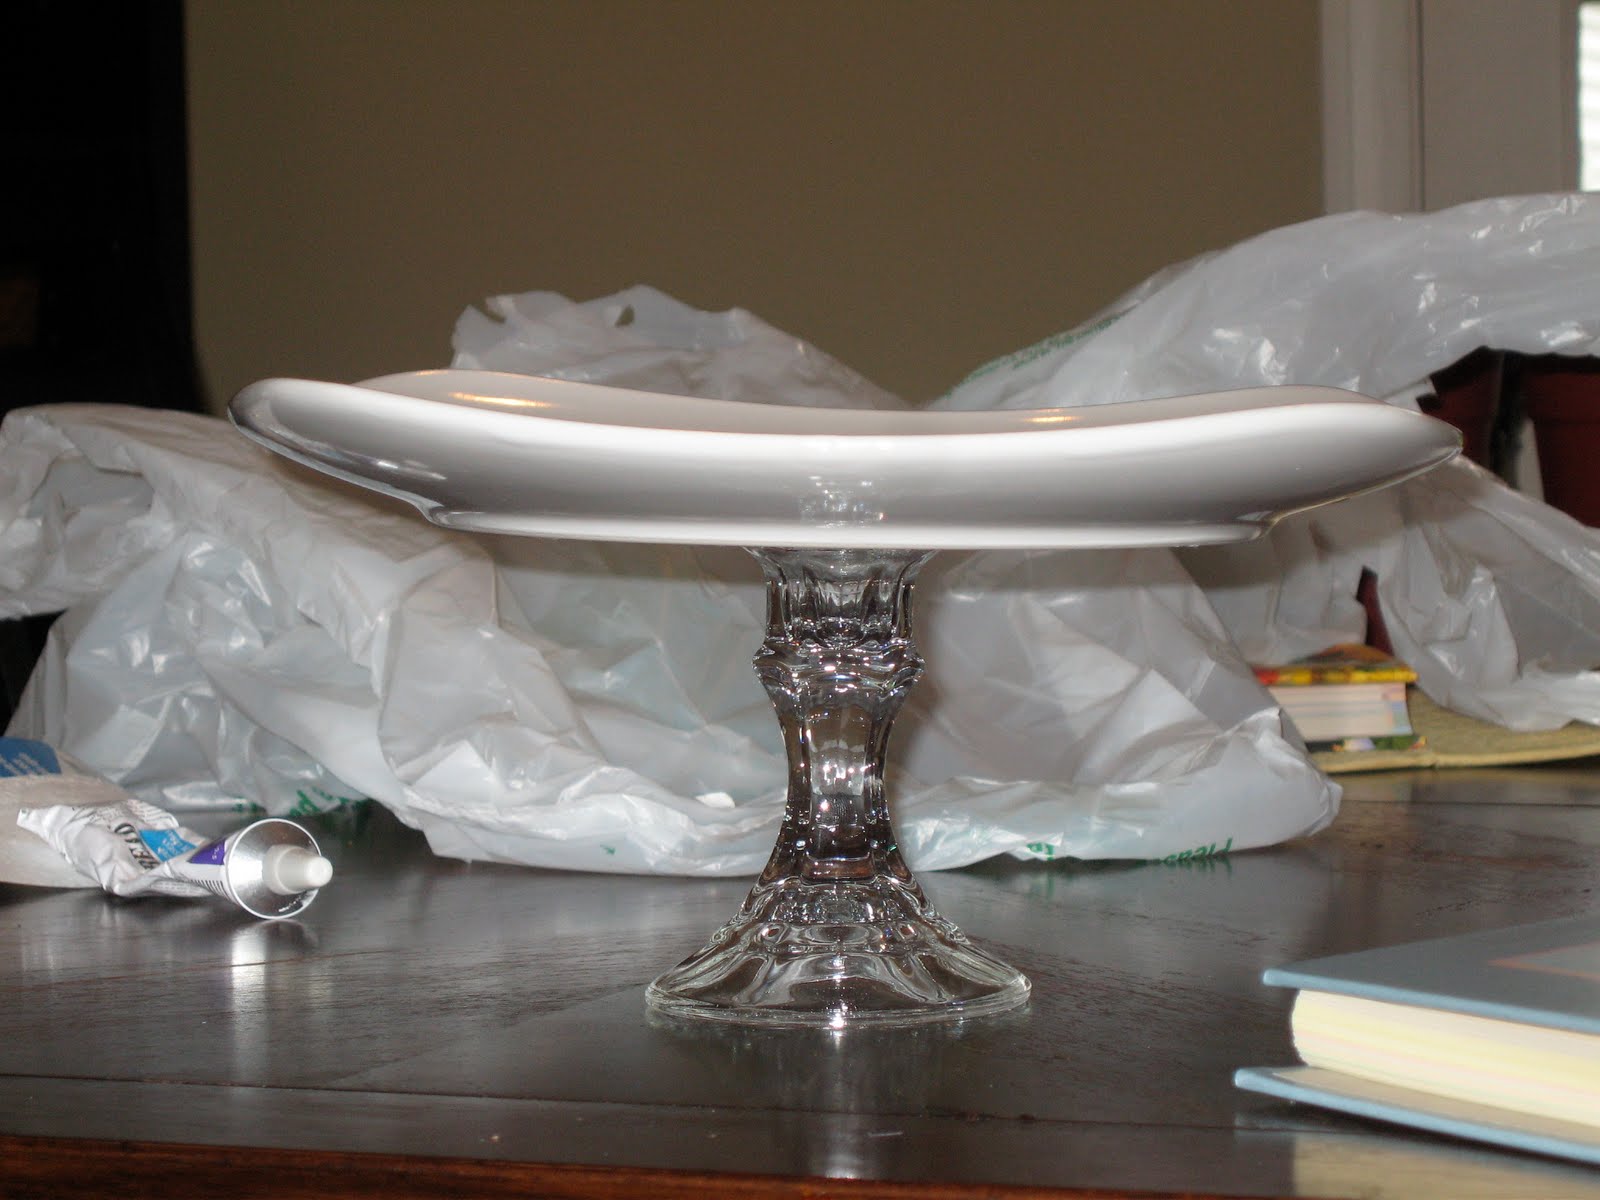
Hello folks. I know my track record for doing crafts at the beginning of the month has been horrible lately.... sorry! It seems like the world of having two kids has completely taken over my life. Anyways, I've got an awesome, quick, easy and very fun craft!!! The girls in my ward at church did a craft night a few years ago and they make these beautiful cake/plate stands using plates and glass candle sticks. They keep popping up at ward functions and they are all so gorgeous and fun I really wanted on. So I thought I would give it a try.

Here's what you need: (ok, sorry for the horrible photos!)
-epoxy ( a type of glue that will glue onto glass and things that regular glue won't work with) or glass glue. I think epoxy works better, so shoot for that. You can probably find it at Joanns or any other craft store. Even Home Depot carries it.
-a plate (any size, color, and shape) My plate is white and my candlestick is glass, I like it, but the girls at church have glass plates and glass candlesticks, it looks really elegant.
-a candlestick

**sidenote: I got my plate and candlestick at the dollar store. So for this whole project I spent about 5$, the glue was most expensive.**


Now, here's what you do:

Turn your plate upside down, and find the center. If you want you can make little marks, so you stick your candle stick down in the right spot. Next, apply the epoxy or glue according to package directions and let it dry THOROUGHLY. I made that impatient mistake and it cost me.

Ta da! That's IT! Once it is dry you have a lovely, fancy looking plate stand! Isn't that awesome?
Here's my finished product. It looks crooked, only because my plate is wavy.... don't let it fool you! :) I love the look of it. Here are some ideas for what I plan to do with my plate stand:

-sit it on my dining table with some fake fruit, changing from season to season (lemons in summer, indian corn for fall, etc.).
-Use it to transport and display cookies and treats for parties, showers, ward functions, holidays, etc.
-Use it as a cupcake stand or cake stand on birthdays
-Displaying my jewelry when I take it to craft fairs

And mostly, just to look at because I think it is so pretty.
Sorry about the ugly bags in this photo.... I'm no photographer! :) The possibilities with this craft are endless really. Keep your eye out for a fun candlestick and then find a plate to match and you've got yourself a unique craft and something useful too!! Oh, and I plan to make a hord of these for gifts, wouldn't YOU be excited to get one?!! PLEASE post pictures if you make one, I want to see all the creativity out there!

3.27.2010

March Craft - Gel Stain/furniture repurpose

This month's craft is kind of a cheater craft. I don't even know if it fits into the "craft" category, but it is a new technique that I just learned and have been playing around with a lot! And.... it's FUN! When my dad was here visiting for several weeks, he built me a table. This cute little table sits in our breakfast nook, and is just what I wanted. We got the wood from the lumber yard and before I painted it, it was just regular wood, nothing fancy or expensive. We were thinking about using our table with a cute black bench that I have, but ended up moving the bench. I tell you that because that was the whole reason I learned how to use Gel Stain.

Gel Stain can be found at home depot, by the paint and stain section. It comes in a variety of colors (or shades). We chose a cherry/mahogany stain, in order to match our other piece of furniture.

So.... here's what you do with gel stain:

1. take any piece of wood furniture, sand it to it's original wood. This is my least favorite part, but sometimes you have to do it. Or if you're lucky, whatever you are dealing with might already be in just the wood form (like unfinished frames, letters, boxes, etc.)

2. Paint your piece, whatever color you like. I did my table with black, semi-gloss paint. I also used gel stain and paint, with a shelf and magnet board for my boy's room. The shelf and magnet board I painted a light turquoise color (pics coming soon, but babies are sleeping at the moment, and I forgot to snap a couple while they were awake). So you can do any color of paint you'd like, just think about how it will look with the stain over top.
3. After you paint it, let it dry completely. Once it is dry, take a little sanding pad or block, or electric sander ( I highly recommend owning one of these, we have used ours A LOT, it was 30$), and start sanding in spots. I like to do the edges and the places where you would see natural wear and tear.

4. After you are done sanding, clean off your surface, and get ready to do the gel stain! To do the gel stain, you just follow the directions on the can.... but here's my two cents.
*wear gloves if you have some, I didn't and I had to go to church with brown stained fingers and finger nails
*use a "non" porous rag, not a washcloth, it will just soak up the stain.
*start staining! You are going to "rub" stain over the ENTIRE piece of furniture, paying close attention to the sanded spots. Once you stain the whole piece, you're DONE! Just let it dry well!

I can't wait to experiment a little more with gel stain. It was so simple and really adds another dimension to your furniture or project. We found a 10$ dresser on craigslist that I painted turquoise for the boy's room and I'm planning on antiquing it a little with our gel stain. It comes in a white-ish color that I think would look really pretty under some blue, green, or yellow paint. It gives your furniture an antique or weathered look. Our mahogany stain looks REALLY pretty and vintage looking with our blue shelf in the boy's room. I'll put up some pictures, pronto!

Enjoy, have fun, and PLEASE share if you do a craft or project with gel stain!!

3.20.2010

Easy Peasy Craft


What is needed?

-Blocks from your child's toy box.

-Scrap-booking letters. The big kind. (I got mine in this big book of paper letters at Wal-Mart... I use them for everything, totally worth buying)

-Some thick wire.

-Some ribbon, it can be the ugliest ribbon on earth, no one's going to see it.

-Oh, and Mod-Podge.

-----

1.Mod-podge the letters to the blocks. Then sand edges if you want to have that rougher look.

2. Take the drill and put some holes into the tops of some of the blocks... use the size just smaller than the size of you wire.

3. Twist the wire around, making sure the end is sort of a flat spiral (like you would draw on paper). The spiral is what will hold the photo, so maybe have a picture you don't care about around to test it on.

4. When the Mod-Podge is dry take your hot glue gun and glue the ribbon to the back of the blocks (making sure they are all at the same level so they'll stand... and leaving a little room between each block so you can move them around).

5. Stick the wires into the tops of the blocks and add pictures.

6. Move to an approved location and enjoy.

It's so easy you'll be up and running for your crafts as soon as you're done reading. Mwahahaha.

2.11.2010

sweet as a sundae

It's time for the February craft! I had A LOT of fun with this one. It's not really a craft, more just something yummy and fun you can do for Valentines Day. I got my inspiration HERE PLEASE go and check it out, you may find something you like about it better than what I did.

To make my Sundae cups, I used the short, fatter clear plastic party cups from Target. Then I found some really cute color of Jelly Bellys that were Ice Cream Parlour flavored. I mostly loved their colors! Plus I used some nibs in the bottom and some fruity mentos for candy. Then in my inspiration, she glues the popcorn to a styrofoam ball, but instead, I made White Chocolate popcorn (pop bags of butter popcorn, melt some white chocolate, and pour it over. Let it dry on wax paper and then you can put it in bags or whatever. I also added red food color to the white chocolate to make it more Valentiney!) And put the yummy popcorn on top! Who wants popcorn you can't eat? Not me! So, I opted out of glueing popcorn and made it choclatey instead.


That's it! Just fill the cups, add the popcorn, and stick a popsicle stick in there for a "spoon." Oh, and don't forget your cherry on top chocolate! Let your kids help, they'll love it, we had a great time making these. My parents come for a visit today and we can't wait to give them their valentines! After I bagged them up, I added a little not that said "You're Sweet as a Sundae, with a cherry on top! Happy Valentines Day!"

Enjoy!

If you want to make some, here's a list of what I used:

Plastic cups
assorted candy
chocolate for the "cherry" on top
popcorn (and white chocolate chips or bark if you want to do it my way)
popsicle sticks

That's it!

1.08.2010

january's craft - feathered headband

Well, this isn't a food recipe, or my 2010 goals... but it is certainly something that will add a spice to your life! :) I've seen these cute, vintage-ish, headbands all over the place. So I thought I would try my hand at making some. These were SUPER fast, SUPER easy, and SUPER cheap! I love that combination.... here we go!

First, your supplies:

Feathers (can be found at almost any craft store, or you can order some online on Etsy)
Headband (fabric or plastic seems to be working for me, I got mine at Target)
Glue of some sorts, hot glue, craft tacky glue, whatever you've got that sticks (I opted for hot glue)
Felt for the backing, not much, just a few smallish pieces, depending on how big you want your feathers to span out.

(this is a horrible picture of supplies.... sorry I shouldn't have even put it in here)
Here's my feathers I chose.... I thought they were cute and would go with brown or black.

Step 1: get your felt and cut 2 pieces. This one is slightly larger, and oval shaped. I also did one that was a little smaller and round)
Step 2: Take ONE piece of felt and start glueing on feathers. Make sure they face the same direction (don't curve two ways) and spread out the way you want them to fan out. Work top to bottom, right to left.
Keep adding and layering until eventually you've got this:
Now, turn your feather pad over and put glue either on your headband or on the pad. I think it is easier on the pad:Then glue it to your headband. Let it set for a couple seconds, then glue the SECOND piece of felt to the back side to make it look all nice!

Ta Da! Here are the two I made all finished. It seriously took me less than 30 minutes from start to finish. The one on the left is the one I did with a smaller round circle. The one of the right is the oval shaped pad.
And, the end results..... a bunch of dorky pictures of myself sporting the fun accessorie. I love it. I'm going to be making a whole bunch more in the next few days I'm sure of it. What else is there to do in Cleveland when snow is falling by the FEET, you have a brand new baby, and you hardly ever go outside? Imagine all the colors.... I'm thinking turquoise peacock feathers are next on the list!
I told you these were dorky pictures. My photography friends are laughing their guts out right now.
This picture is dorky too, but I had to include it because you can see my little E baby in the background! Isn't he cute?!
Here's a top shot of the smaller one.....

Enjoy my friends! And please share if you make one!!

12.07.2009

a few of my favorite things.....

Crafting at Christmas.... oh boy, that list will never end. Christmas time seems to the be the time for everything, crafting, yummy food, giving gifts, family parties, etc. So, it was really hard to think of one craft to share with you all. I also feel a little guilty because for the past few months my crafts have been "copied" from other crafters around the blog-o-sphere. My apologies, I have very high hopes for myself come january. In the meantime, I wanted to share just a couple of some of my favorite little crafties for this month. If you click on the picture, it should link you to the tutorial.
A Christmas planner.... what a great idea. I have lists and lists and hidden lists all over my house, and receipts floating everywhere, this would really help me get a handle on things!


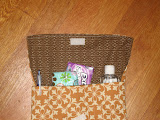
Isn't this a great idea for little gifts? Good clean fun. Hand sanitizer, all she did was rub the labels off, and add stickers and ribbon. Brilliant. And adorable!


These are little goodie bags with treats and Christmas tree toppers in them! So fun, and simple, especially if you are the scrapbook type and can make cute labels like this....

This is SUCH a great idea, and wonderful way to use up scraps of material! It makes a super cute, easy, fun, economical gift for ANY time of year. I made some towels for my kitchen to match my chairs i recovered and it was so easy and really pulls my kitchen together. Love it. And the coasters are awesome!

MERRY CHRISTMAS and happy crafting!!!

11.10.2009

November's Crafts


Hello again! Our craft person Kara is still very distracted and busy with her brand new adorable baby! So for the craft of the month I thought it would be fun to do a post about this fun website: So You Think You're Crafty!! They started with 10 crafters and every week they have to do a craft that fits a specific theme and the one that gets the most votes gets to post a tutorial and the one with the least votes is "eliminated". Last week's winning craft was SO cute! So go check it out for lots of Fall craft ideas! Just click on the button!

8.03.2009

One Hour Craft - Placemat Pillowcases


This is just too good to pass up! I saw this idea on a blog a few weeks ago, and as I've been trying to decorate my living room, I decided I needed some different pillows. Well, I found some very cute, very inexpensive placemats at Pier 1. Basically, the directions include 3 steps:

1. get a seam ripper and open the seam just enough to fit your hand inside
2. stuff, stuff, stuff
3. hand sew it back up

It is seriously so easy and satisfying to do a project in less than an hour. And I love them!! It's a great way to spice up any room, and placemats come in a HUGE variety of colors, textures, and patterns. I'm planning a whole bunch more of these babies. For a more detailed tutorial, go HERE!

6.30.2009

One Hour Craft - Purse Carry-All

Well, if you are like me, you are always switching things from bag to bag. From the purse, to the church bag, to the smaller "date night" purse, etc. So, do you ever get sick of pulling all the loose odds and ends out of one bag and transfering them? Well, now you can put them all in one spot, and then all you have to move is this handy little pouch. I like to keep my essentials in here like: hand sanitizer, lip gloss, a pen, tissues, wipes, etc.

So, let's get started. Okay, first, pick your fabric and cut it to the size you want. What you want to make sure is that when you fold it about half way, that you have enough for a flap to make the closure.... does that make sense? sorry, I don't measure anything.

Here's my two pieces of fabric. The orange is going to be the front and the brown is the lining. 
Step 1: sew right sides together, leaving the "top" open, as if you were making a pillow case.

Here's my "pillow case" folded right side out, ready to fold up and sew again.
Here's the other side.
Step 2: fold it about half way up with "right sides" together again. Don't worry about the open top, we'll do that in a second.
Step 3: Sew up the sides.
Turn it right side out again, now you have your pouch, all is done except for the top raw edges.
Now, it is going to seem weird, but we're going to sew on the "right" side to make some little pockets. Before you start sewing your pockets, sew on your velcro, it will be easier, I waited until I was done and it came out crooked, just check the photo. 
It's just straight lines, so don't get anxious. You can make as many pockets as big or small as you want. Here's a picture of my pockets, I made three (which means I sewed two lines). 
Then I sewed the top closed, I turned it under about 1/4 inch and sewed straight across. Then I sewed on the velcro..... pretend you don't see my crooked velcro, okay? See, I'm not a perfectionist!
Then you can embellish the front or do whatever you want to your cute little carry-all. I love mine, it is so handy!
And of course, lastly, fill it with all the goods, stick it in the purse or diaper bag and go!

6.01.2009

June's Monthly Craft - Car Trash Bag


Okay, I know from the title you are thinking I'm really weird.  But like I just said in my previous post, I have moving on the brain.  We are headed on a 12 hour car ride to move and I'm thinking of all the stuff that I'm going to need in my car.... and all the trash.  My hubby loves a clean car, to which I'm eternally grateful! It is always clean, so for this months craft I decided to make this car trash bag.  It is from this wonderful site called Make It and Love It.

And since our lives are pretty chaotic right now, I'm letting you use HER tutorial instead of mine.  Maybe if I get around to taking pictures, I'll post them of my finished product.

4.16.2009

Pin Cushion/ Button Jar

So, a while ago I posted a quick little link to an idea I had seen on another site. Here Well I finally got around to making one of my own. Which looks nowhere as cute as theirs, but took me about an hour. It was so easy and I'm completely excited to have somewhere to stick all my pins and needles (instead of carrying around the box they came in). Take a look. I used an old chicken bouillion jar so it's a bit bigger than a baby jar (hence the larger ribbon) and I'm into using up what I've got floating around, and I also don't have a fabric store in my town *sniffle*.

The picture was taken with my phone, so it's not the best photo in the world either... and if you're wondering, that's pomegranate juice in the background, if anyone wants to hop on over to my place and show me how to make jam out of it I'd be forever grateful.

4.05.2009

One Hour Craft - Fabric Flowers

April craft time.... just in time to make some cute flowers for your little girls, or yourself!! These flowers I just made up myself and are very simple... I'll try to explain the best I can.

First, start with a bunch of circles of fabric. They are all pretty much the same size, and they don't have to be perfect. I like using a couple different fabrics together, like the black polka-dot and then I used some black tulle. Same with the pink.... you'll see later.

Second, take one of the round pieces and bunch it up in your fingers.... like so....
Then take a needle and thread and start sewing together your bunches. It helps to kind of shape and sew as you go, pulling up material in the needle to make it look the way you want. Does that make sense? Probably not.... sorry.
After I had one bunch done, I just slipped another circle onto my needle and thread and did the same thing. So, I had about 3-4 circles sewn together, and then I added the tulle at the bottom. In the next picture, you can see the bottom, I took a much smaller circle, and sewed around the edges to make it look a little more finished (plus it is easier to glue or sew it onto something else).
Here's the pink one all done! Isn't it cute!!
And the black....

These are fun to use on whatever, hair bows, headbands, bags, dresses, belts, whatever suits your fancy!! Have fun, and please share if you make some, so we can see all the great ideas!