THIS MONTH ON MOMMY DIARIES

Ingredient of the month: Cream of Chicken Soup

Do you want to be our newest author? Click here!

2.26.2010

I hate being a mom........ keep reading!!

Obviously I do not hate being a mom! My baby is the best thing that's ever happened to me and I feel like being a mom is the most rewarding and special thing I could ever be doing!! I know I am meant to be a mom and have always wanted a lot of kids!
There is one part that I do HATE that I have been experiencing a lot lately...and that is WORRYING!!!! I feel like the most paranoid, worried person on the planet when it comes to my baby and the anxiety really makes me crazy! Here is a for instance.....
Last Thursday everything was totally normal and fine all day and night, then randomly at 5 am I BURST (literally) out of bed to the sound of a horrible cough, choking sound..I rushed out of the room threw open Dylan's (my baby) door, completely panicked, grabbed him and ran into my room and just set him by my husband and continued to freak out! He had a croupy like cough but sounded like he had a hard time breathing, I Always assume the worst (Which is problem #1) instead of assuming it's just a cough. I grabbed the phone and called my mom! To make a long boring story short I filled the bathroom with steam to clear his throat and had the longest weekend of my life frantically worrying about this cough! I DREADED going to sleep at night and one night put him in our bed so I would be close to him!!
Of course that first morning the front page of the news paper is RSV spreading through the valley..and I couldn't stop thinking about that! We were just waiting for his insurance to go through so at the time he wasn't covered, he really wasn't bad enough to take to an urgent care, which is the point of this post! It's not like he had anything terrible (I read forever online and called some nurse friends and came to the conclusion it was just the croup and NOT RSV) he was pretty okay during the day and he could breath just fine, but it was the fact that I FREAK out soooo easily!!! I was just driving out to my parents sometime in the midst of the cough stuff and just wanted to cry because of how worked up I get! When I talked to people they are like oh he will be fine don't worry it's probably just the croup, so then why can't I look at it that way? Why is everything so much scarier with your kid? If it happened to someone else I knew I would be saying the same thing... he is fine, not a big deal! I HATE to think what I would be like if something serious actually happened!
I've always been the type to separate myself from others in pain, anytime I had a sick pet I could hardly look at them, I had to stay away till they were better. Of course, I wouldn't just walk away from my sick child but I do just want to hand him to my husband and not look till he's all better, I know if I am alone I can find the strength to do whatever he needs but no doubt lose it later!
Anyways this is getting long I just wanted to kind of talk to some people who probably know exactly what I mean, all being moms yourselves! I have always wanted a lot of kids but I'm afraid of multiplying the amount of people to worry about, or does it get better with experience and practice? I just want to be stronger and have more faith that everything is fine! Again it was not that big of deal but it was such terror for me! I always think of the worst outcome and I need to know how to NOT think that way!!! Thanks for letting me vent!! I hope I'm not the only crazy paranoid mom out there:)... It really is painful to love something so much huh!?! But definitely the best thing in the world:)

2.20.2010

Tomato Noodle Soup

My husband and I have been in ultra save money mode recently and I have been try to come up with recipes that need as little meat as possible. This one only uses 1/2 lb of ground beef but you could always use a full pound if you like your recipes a little meatier. I personally made this recipe up but I am sure it is really similar to a lot of others out there.

Chop up a carrot and celery add to a couple of cans of tomato soup. You can keep your soup condensed and just use more cans but that is a little thick for me, so I diluted it with milk. I used whole milk to make it really creamy but you can use a lower fat milk if you want.

While those ingredients are heating together, make a package of pasta as directed and brown a 1/2 lb- to a full pound of ground beef. Drain the beef, add to the soup. Drain pasta when tender and add to soup.

Let the soup all simmer together until the celery and carrots are tender. I add Italian seasoning and a little bit of dill to my soup to top it off.

Enjoy.

2.19.2010

An Intro

Hi! I'm introducing myself to the Mommy Diaries world! I'm Morgan. :) I was introduced to Mommy Diaries by Anna and am so glad to be here!

I have three boys, ages 4, 2, and almost one. They keep me busy. I thoroughly enjoy it when strangers say, "YOU have your hands full!" when I walk through the grocery store. Yup. I do. And I wouldn't have it any other way.

My husband is Derek. He's a marriage and family therapist and in his spare time is finishing a PhD. Phew!

I'm a doula when I'm not a mom. It is very challenging, but I love it.

I like chocolate. And Diet Coke. Together or separate. I'm not picky. But I am addicted. :)

I blog at: www.ingfamily.blogspot.com and www.thedietcokediet.blogspot.com.

From February 2010

Button

Hello Mommies!
As some of you have noticed our button is broken. Since someone else made it we aren't sure how to fix it so we are making a new one. Sorry for the inconvenience, the new one should be ready soon! Feel free to remove the old one for now though since it obviously isn't doing much good, and the new one will have a different code! :)

2.18.2010

Tricks of the Trade: In One Ear...And Out the Same

I love to learn, but my knowledge, especially as a mother, is too often gained the "hard way". I have three children, the oldest is five years old, and I had yet to deal with the whole foreign object inserted in body part issue...UNTIL...this week.

This week, my five-year old son inserted a popcorn kernel in his ear canal and I had NO idea what to do. I'll spare you the nitty gritty details (if you're dying to hear them, click HERE), but I'll dish the advice I have gained after going through this little experience. Maybe I can save you the pain of paying for a visit to the doctor's office, Urgent Care, or Emergency Room to remove the dirty, rotten, no-good foreign object.

*The very FIRST thing you should do is remain calm. Your child can panic if he/she sees you getting flustered. Obviously, remain calm so as not to scare your child, but also remember: A panicky child is a squirmy and uncooperative child. If they grow hysterical, it will make removal of foreign objects that much more impossible.

*The very other FIRST thing (I know. I gave you two "FIRSTS", but moms are good at multi-tasking. You can do it!) you should do when you recognize that your child has put something in his ear (or nose) is....STOP AND THINK! Assess the situation before you touch anything. You can make it worse even when you are trying to make it better. Trust me. I learned this one the hard way.

After you've done these two things, you still have the task of removal ahead of you. Hopefully, it will be easier with my first two tips, but you still need to get that thing outta there.

I am now an expert on popcorn-kernel-in-ear, but I imagine you could use these tips for other objects as well.

*With child's head tipped with the affected ear towards ground, grasp the upper portion of the ear and gently pull up and out. This can change the shape of the ear canal. Try wiggling the ear a few times to see if the object will fall out on its own.

*Apply some superglue to the tip of a toothpick. Carefully insert toothpick and gently touch glue to object. Allow time to dry and slowly pull object out.

*If these two things haven't worked, construct this tool (Sorry about the crude drawing! Doesn't the pretty border make up for my lack of artistic skills though? Haha!) :


This is what our doctor used to remove the kernel from my son's ear in two seconds. It looked like a dental tool, but I bet it wouldn't be too difficult to rig. You could use a pencil and some crafting wire (a paperclip would probably be too thick of wire) or some fishing line.

Other methods that were unsuccessful for us, but might work for you:
*Use a bulb syringe or straw to gently suck it out

If all else fails, PRAY! and make your way to the doctor's office. Surprisingly, removal may not be as emergent as you think. In our situation, the doctor's office was fifteen minutes from closing time and I didn't have a car to get us there. Of course this isn't "official" medical advice, but our pediatrician's office told us that as long as it wasn't bothering him, we could wait until the morning to have him seen. If he was uncomfortable, he needed to be seen at Urgent Care as soon as possible.

Have you had experience with this little predicament before? What did YOU do??

Have any other tips for getting stuff out of ears OR noses? We'd love to hear it!

2.14.2010

Chocolate Covered Strawberries

I wanted to get this posted before Valentine's Day because it's perfect for the day of love...but I guess I'll have to spin it as a wonderful way to celebrate President's Day!

This is such a simple, fun, and fancy treat to make. And it doesn't get much kid-friendlier than this!

Have your kids grab some of this from your baking aisle next time you go grocery shopping:

Then let them wash some of these and leave to dry:


Melt the chocolate in a bowl in the microwave for about a minute...stir...heat an additional 10 seconds or so until it's deliciously melty. Have your kids dip the strawberries and lay them on some wax paper to cool. Keep in the fridge until ready to eat.

2.13.2010

How To Make Rope

My little girl made a her first tutorial (with my help) for her own blog--to show her cousins-- and it was so great I thought I'd share.

Here's how you make rope...

step one
take three pieces of thread, string, yarn or twine and cut them to equal lengths.


Step two
tie a pencil to each end of the 3 strings

(it can be a stick also)

Step three
pull string taught between two people (one can improvise)

Step four
spin pencils in opposite directions


Step five
balling string is bad

Step six
after you are done spinning the three strings together you are going to fold it into thirds. do this by putting both pencils together.

the string should loop around pencil #1 and go back to person #2

then pull the folded string onto pencil #2 making three strings again.

Like this

Step seven
spin string in the OPPOSITE way from last time. (remember balling is bad, but if it balls just pull away from each other as hard as you can... it will eventually work)

step eight
pull off of pencils and please tie the ends so your rope doesn't come undone.

Now what to do with your rope...

For girls you can tie it in your hair:

Or
Make a head band:


Isn't my mom so awesome!

Since I'm not a boy I don't know what a boy would use it for... why don't you be creative (and tell me what you come up with).

2.12.2010

Easy and Fun Flower Valentines


We adapted this idea from Family Fun and we had a blast making our flowers together. My 4-year-old loved choosing what colors she wanted for each individual friend. All I did was cut everything out (not the most fun part) and tape the bottom after she assembled them. The end result was a beautiful flower garden. Then she addressed them to each friend on the leaf (probably best to address them before you assemble them.)


To make flower valentines:
  • Cut out 3 hearts to make the petals

  • Cut out 1-2 leaves out of green paper

  • Take a circle punch to a cute scrapbook paper with fun designs and cut 4 triangles out of it to make the inside of the flower

  • Have the child assemble the flower onto the lollipop (inside, petals, leaf)

  • Put a small piece of tape around the bottom of the flower to keep it from sliding off the end of the lollipop

2.11.2010

Accordian Book/Card

Aaaahh...Valentine's Day approacheth. The day of love and chocolate and CARDS! I can not lie... I am a huge fan of handmade cards made complete with personal messages of love. (Wish my husband would clue into that...It would save him a lot of stress and money every year.)

I always love finding a new approach on the handmade card. A friend taught me how to make these cool accordion book/cards last year. They're perfect for any occasion, but I thought they would make extra-special valentines. This year I am making one for my husband and each of my kiddos. My printer won't cooperate so I haven't been able to finish them, but I wanted to get this posted so you had a chance to make one before V-Day. I included pictures of three I made last year for my sisters and sister-in-law. (See bottom of post)

I am often found two steps behind the rest of the group, so hopefully you have not already made this ages ago in Homemaking meetings across the globe.

Don't mind all the pictures. Maybe you're like me and more of a visual learner. In that case: You're welcome! Ü

To make one accordion book/card you will need:

3 pages of 8.5 x 11 card stock
1 piece of cardboard (you could cut up a box)
1 page of patterned paper (12 x 12 sheet)
ribbon
your preferred crafting glue (I use a glue stick)
a glue gun and glue sticks
scissors or paper cutter
additional craft supplies you want to use to personalize the middle
Optional: clear tape


Cut all three pieces of card stock into perfect squares (8.5 x 8.5).


Fold square in half. Make the fold sharp, precise, and defined. Fold it back and forth a couple of times to make it flexible. (Take your time with ALL the folds. Be careful and precise. It's not difficult; it just needs careful attention.)


Unfold paper, rotate, and fold in half again so that you will have perpendicular folds that will divide your square into four equal squares. Again, make your folds sharp and defined.


Fold your square diagonally into a triangle. Just as before, make sure folds are defined. ONLY FOLD ONE DIAGONAL FOLD. DO NOT ROTATE AND FOLD IN A TRIANGLE AGAIN.


Bring opposite corners that have been folded in triangle (If you look at the above picture, it's the bottom left and top right corners) together. Allow them to collapse so that the two squares that were NOT folded in the triangle sandwich them.


Repeat these steps so that all three pieces of card stock are exactly alike.

Unfold papers and lay them together as show in the picture below. Place the middle paper on top of the others. Match up the squares as perfectly as possible and use a glue stick to secure in place. Be generous with gluing. These pieces are going to move often and you want them to be secure.


Now you have the accordion part of your book! You may have to play with it a bit to figure out how it collapses and expands.


If you folded things right, your accordion book should have 4.25 inch squares.

Next you will make the cardboard covers. Cut two 4.5 x 4.5 inch squares out of cardboard.


Now take your patterned paper and cut out two 6 inch squares to cover the cardboard.


Next you will secure the patterned paper to the cardboard. I like to use my glue gun for this. Glue sticks just aren't up to the task. Hint: Fold the paper on like you are wrapping a gift, dotting hot glue along as you do.


Although they should be square and not really matter which way is up, I like to draw arrows on the side that will be glued on the card stock just to help my scatterbrained nature.

Before you glue the covers onto the innards you need to glue on ribbon pieces. The ribbon will be used to tie around the finished book to keep it from falling open. There is probably a better way to do it than the way I do it, but all I know is what I know, so here is my technique.

I glue two separate lengths of ribbon onto the top and bottom of the cardboard cover that will sit on the top of the book. (Another reason I put arrow markers on there.)

Hint: You could use tape to temporarily secure your ribbon and see how it works for you. (If you are having trouble figuring out how to piece the three pieces of card stock together to make the accordion, you could also use tape to figure out the mechanics of it before committing to glue.)


Below is the front of the book with the ribbon wrapped down and around the back and tied in front.

Hint: I used a lighter to melt the ends of my ribbon so as to prevent fraying. Works like a charm!


This is the back of the book with the ribbon wrapped around.


Now I use my handy-dandy glue gun again to secure the card stock innards to the covers. Work quickly, but make sure you are aligning your squares neatly AND securely.

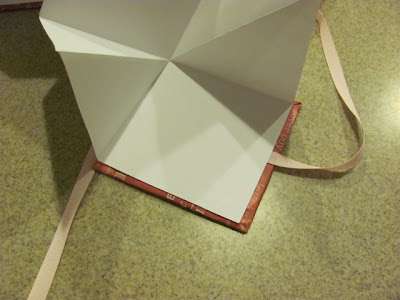
You could glue your innards on however you want, but I like to do so that when I unfold it, it lifts from the bottom right corner and expands up and to the left. Did I confuse you more by adding that?? Sorry if I did!


The semi-finished result! (I just realized that my book is technically upside-down in the pictures above and below...Disregard that. According to the directions I've given you, the ribboned cover would have been on the top. You may not have even noticed; I'm just telling you in case you had and were confused that my picture looked different than what the instructions had dictated. SORRY!)


Now, you can fill the innards to your heart's content! Go crazy! Use pictures, quotes, accessories, flowers...the sky is the limit! The book has some give when folded up so don't worry too much about making it "too" thick.

JUST REMEMBER, THE FOLDS FOLD WHEN IT IS COLLAPSED SO DON'T GLUE THINGS OVER THE FOLDS. You can cut pictures in half or place words around the fold.

Again...Sorry I don't have this one finished to show you, but here are some pictures of others I made (I think it was for Mother's Day...). Click on pictures to zoom in.


Hopefully, between pictures and instructions you can figure out how to make this great accordion book/card. If you have any questions, put it in the comments, and I will do my best to answer it.

And let us know how yours turned out! Send me your pictures at claytonevelyn@gmail.com and I will post them or post it on your blog and leave a comment with the link!

Happy crafting and HAPPY VALENTINE'S DAY! ♥♥♥

sweet as a sundae

It's time for the February craft! I had A LOT of fun with this one. It's not really a craft, more just something yummy and fun you can do for Valentines Day. I got my inspiration HERE PLEASE go and check it out, you may find something you like about it better than what I did.

To make my Sundae cups, I used the short, fatter clear plastic party cups from Target. Then I found some really cute color of Jelly Bellys that were Ice Cream Parlour flavored. I mostly loved their colors! Plus I used some nibs in the bottom and some fruity mentos for candy. Then in my inspiration, she glues the popcorn to a styrofoam ball, but instead, I made White Chocolate popcorn (pop bags of butter popcorn, melt some white chocolate, and pour it over. Let it dry on wax paper and then you can put it in bags or whatever. I also added red food color to the white chocolate to make it more Valentiney!) And put the yummy popcorn on top! Who wants popcorn you can't eat? Not me! So, I opted out of glueing popcorn and made it choclatey instead.


That's it! Just fill the cups, add the popcorn, and stick a popsicle stick in there for a "spoon." Oh, and don't forget your cherry on top chocolate! Let your kids help, they'll love it, we had a great time making these. My parents come for a visit today and we can't wait to give them their valentines! After I bagged them up, I added a little not that said "You're Sweet as a Sundae, with a cherry on top! Happy Valentines Day!"

Enjoy!

If you want to make some, here's a list of what I used:

Plastic cups
assorted candy
chocolate for the "cherry" on top
popcorn (and white chocolate chips or bark if you want to do it my way)
popsicle sticks

That's it!

2.08.2010

Tricks of the Trade: The "Talk"

My question is regarding the dreaded "birds and bees" talk. We have two 7 year old boys and are facing this discussion soon. I can't believe it is time already, but kids are growing up faster than ever, and I want to be the number one information center for my kid. They pick up so much from school and the TV. So, when is the right time to have a discussion about sex, and how much should we cover? Anyone out there done this yet and have any tips to make it easier and less horrifying for us all?

Adoption

We have this cute couple in our ward that is trying to adopt a child. They are amazing people and will be great parents. If you know anyone that is thinking about adoption, please keep this sweet couple in mind. Thank you!

2.07.2010

Felt Hairclips

I am loving the trend of felt hair clips. I think that they are so cute and I tried my hand at them and they were also super easy (really just cutting shapes, optional sewing details, and gluing on alligator clips). This is my favorite site for ideas. Has anyone else been making these or have any other simple ideas for the craft-impaired such as myself?

Oh, and the most important part in my opinion is that my little girl loves to have them in her hair.