THIS MONTH ON MOMMY DIARIES

Ingredient of the month: Cream of Chicken Soup

Do you want to be our newest author? Click here!

Showing posts with label craft. Show all posts

2.13.2010

How To Make Rope

My little girl made a her first tutorial (with my help) for her own blog--to show her cousins-- and it was so great I thought I'd share.

Here's how you make rope...

step one
take three pieces of thread, string, yarn or twine and cut them to equal lengths.


Step two
tie a pencil to each end of the 3 strings

(it can be a stick also)

Step three
pull string taught between two people (one can improvise)

Step four
spin pencils in opposite directions


Step five
balling string is bad

Step six
after you are done spinning the three strings together you are going to fold it into thirds. do this by putting both pencils together.

the string should loop around pencil #1 and go back to person #2

then pull the folded string onto pencil #2 making three strings again.

Like this

Step seven
spin string in the OPPOSITE way from last time. (remember balling is bad, but if it balls just pull away from each other as hard as you can... it will eventually work)

step eight
pull off of pencils and please tie the ends so your rope doesn't come undone.

Now what to do with your rope...

For girls you can tie it in your hair:

Or
Make a head band:


Isn't my mom so awesome!

Since I'm not a boy I don't know what a boy would use it for... why don't you be creative (and tell me what you come up with).

11.10.2009

November's Crafts


Hello again! Our craft person Kara is still very distracted and busy with her brand new adorable baby! So for the craft of the month I thought it would be fun to do a post about this fun website: So You Think You're Crafty!! They started with 10 crafters and every week they have to do a craft that fits a specific theme and the one that gets the most votes gets to post a tutorial and the one with the least votes is "eliminated". Last week's winning craft was SO cute! So go check it out for lots of Fall craft ideas! Just click on the button!

10.24.2009

Saving Memories

So my girl had her baptism today. And with the help of Jill and her wonderful Bayberry Announcements I was able to send out some dang cute cards for all that family who couldn't make it out for the event.

But I had a few left over and I wanted to do something to help my little one remember her great day.

*light bulb turns on above head*

You know how you go to weddings and people have you sign the matting around their photo instead of a guest book? Well, I took that idea and twisted it just a bit.

Instead of having people just sign their names, I asked if they would please leave some words of advice or encouragement for her on this important day in her life.


We live in a small branch so there wasn't very many people to sign it, but I think it turned out nicely don't you?

Now she will have a beautiful momento to keep for years to come and perhaps when things get a little tough she can look on her wall and see that others love her and understand.

Feel free to use my little idea. *wink* I told my husband it was such a good idea that by next year everyone in the church would be doing it (which would please me immensely) :).

5.23.2009

Personalized T-Shirts

So, this isn't the greatest picture of one of my latest projects, but there is a great tutorial at Tangled and True on how to make your own personalized t-shirts. It took a little while for my craft-challenged self to cut out the stencil, but it was a relatively easy project that is pretty exciting for kids to wear. Let me know if any of you try it - I'd love to have other ideas other than just names.

4.16.2009

Pin Cushion/ Button Jar

So, a while ago I posted a quick little link to an idea I had seen on another site. Here Well I finally got around to making one of my own. Which looks nowhere as cute as theirs, but took me about an hour. It was so easy and I'm completely excited to have somewhere to stick all my pins and needles (instead of carrying around the box they came in). Take a look. I used an old chicken bouillion jar so it's a bit bigger than a baby jar (hence the larger ribbon) and I'm into using up what I've got floating around, and I also don't have a fabric store in my town *sniffle*.

The picture was taken with my phone, so it's not the best photo in the world either... and if you're wondering, that's pomegranate juice in the background, if anyone wants to hop on over to my place and show me how to make jam out of it I'd be forever grateful.

4.08.2009

Easter Eggs

One of my favorite activities every Easter is dying eggs. And since having kids I have loved doing it even more! I love how it brings the family together and I love the anticipation of what the final result of your egg will be. Every year we have the tradition that the last egg to be dipped takes a turn in every color...leaving us in the end with one ugly brown egg.

Click on the links below for some fun ideas to do with your children and your eggs...feel free to comment and tell us what you plan on doing!


  • Animals from Family Fun: Mouse, Pig, Sheep (I'm pretty sure I've fallen in love with these!)
  • Dying Techniques from Amazing Moms: Egg designs
  • Or if you are out of Paas packets you can always find a more natural way to dye them here.
Have fun this year dying eggs with the kids!

My Necklace Holder


You're right Cassi! I forgot to post a picture! Well here it is. I love the idea of making the necklace holder bigger. I wish I had one more peg on mine. One of them keeps falling down. I'm going to make a "manly" looking one for my husband's belts. They're always on the floor!

Necklace/Key Holder

Ok, I know more of you made the necklace holders from last month! Chalece... I know you made one! It's always fun to see pictures and everyone's different styles!
So, here are mine. I did one for my keys and one for necklaces. I wanted the necklace one to be a little bigger. And you can't really see it, but there is one of Kara's fabric flowers on the bigger one. So I did both crafts in one! :)
Anyone else?

4.05.2009

One Hour Craft - Fabric Flowers

April craft time.... just in time to make some cute flowers for your little girls, or yourself!! These flowers I just made up myself and are very simple... I'll try to explain the best I can.

First, start with a bunch of circles of fabric. They are all pretty much the same size, and they don't have to be perfect. I like using a couple different fabrics together, like the black polka-dot and then I used some black tulle. Same with the pink.... you'll see later.

Second, take one of the round pieces and bunch it up in your fingers.... like so....
Then take a needle and thread and start sewing together your bunches. It helps to kind of shape and sew as you go, pulling up material in the needle to make it look the way you want. Does that make sense? Probably not.... sorry.
After I had one bunch done, I just slipped another circle onto my needle and thread and did the same thing. So, I had about 3-4 circles sewn together, and then I added the tulle at the bottom. In the next picture, you can see the bottom, I took a much smaller circle, and sewed around the edges to make it look a little more finished (plus it is easier to glue or sew it onto something else).
Here's the pink one all done! Isn't it cute!!
And the black....

These are fun to use on whatever, hair bows, headbands, bags, dresses, belts, whatever suits your fancy!! Have fun, and please share if you make some, so we can see all the great ideas!

3.11.2009

One Hour Craft - Mirror Necklace Holder

Okay, are you ready for another really fun and simple craft? I loved making this, it was easy, fun, and very functional. I normally just have my necklaces strewn all over the place and this was a great way to help me organize them a little better. So.... what you need:

- a plain wood picture frame, any size you want
-material, enough to cover the frame and little extra to cover
the middle part inside
-a mirror, it should fit in the hole of the frame
(these are really cheap at Michaels, come in a variety of shapes, and have about 4
in a package, so if you live close to people and want to make these together, share
the mirrors, or make a bunch and give them as gifts!)
-knobs or hooks (however many you want, I used two)
-glue gun, modge podge, and ribbon for embellishments

First - cut out your material to fit your frame, leave about 1 inch to wrap around the back. Don't forget to cut out the center hole. Now, using modge podge, pull the material tight and glue it to the back of the frame. Make sure you go over the edges really well with the glue.

Second, take some cardboard (or in my case, I had some cork board laying around) and cover it the same way you did in the first step. This is going to go in the frame, in place of the picture, and we are going to hot glue the mirror to this piece, so it should be sturdy.

Third, stick the covered carboard piece into the frame and secure it, then using hot glue, glue the mirror in place in the middle of the frame. Then, take your knobs and hot glue them where you want them on your frame.


Lastly, I used some ribbon, and made a little flower out of fabric and hot glued them on. Now, add some jewelry, hang it up and pat yourself on the back!! This was such a fun project to make. I hope you enjoy, and PLEASE don't forget to post a picture when you are done!!!PS - I wish I could take credit for this idea, but I'm not THAT creative! :) I got this idea from here.... she has a little different take on it, but very cute none- the- less, and you may think her tutorial is better. It's okay if you do, I won't be mad. I like mine because of the mirror, I always need a mirror when I put on my jewelry.

To see more examples from other contributors click here.

3.09.2009

The $1 Project

My little girl has had this big closet door she's been trying to deal with for several months now. It's one of those annoying ones that's always falling off the hinges and since she's only seven it makes it difficult to keep that area of her room looking kept up. Finally the other day I had an idea, I decided to put up a curtain instead.

So I rummaged around a little and found an old shower curtain we weren't using, and the an old shower rod and went to put it up... except the curtain wasn't long enough.

Easy enough to fix, I thought, I've got enough fabric lying around. So I put the baby down for his nap and hauled my find down to my sewing machine. I didn't really measure anything, just eyeballed it, but it was all straight line stitching so it wasn't difficult. This is what the bottom turned out like:

This is where the dollar comes in, I didn't have any rings for the shower curtain to hang from. So.... on my way to pick the kids up from school I stopped off at the Dollar Tree and bought a set. All in all it took me about two hours (if you count the going to the store into it all) and this is what I got:Now my daughter can get into her closet, and because of the white fabric the room has an airier feel to it. She's very excited (as am I), and it was so easy to do that I've started eying the boys closet too. Plus, I just put the old closet door downstairs. That when when we decide to move again we'll be able to put it right back up without it having excessive damage from years of kids trying to open and shut it.

Next, I think I'll find some fun iron on's to put on the white of the curtain, just for effect.

3.06.2009

Clever Idea's

I found this one over at whipup.net (which really just sends you to other places they found it at), but it's such a great idea I had to share. Baby Food Jar Pincushion.

Enjoy.

3.01.2009

Placemat Bag


So, my picture isn't very fabulous, but I love how the bag turned out. My daughter's favorite color is red, so she helped me pick out the placemat and ribbon and it has turned into a great church bag. Thanks for the instructions, Kara, it was really fun to make (although, because of my non-craftiness, it was a little more than a one hour project - but fun nonetheless!).

Placemat bags

Kara asked for pictures so here's my picture! I kind of got carried away. I already had some placemats saved up and then I saw the pink one with the green trim at Target and had to have it. So I figured I might as well make a bunch at once. And here they are. I'm not a huge fan of sewing on the ribbon like Kara did. It's way cute but I don't sew very straight! :) So I experimented with a few other things like the bows, buttons, and flowers!


So... did anyone else make one?

2.17.2009

One Hour Craft

I LOVE crafting. Let me tell you, I’m NO expert, I just love working with my hands, seeing something that I created with my hands, and I love the feeling after I complete a project and it actually works! J So, I thought it would be fun to start a little craft corner on the mommy blog. My hope is that I can find and post crafts that EVERYONE can do, that are simple, in-expensive, only take about an hour, and FUN! Remember to have fun and get creative!!

This month, we’ll be making placemat bags. These are great bags that are perfect size for lots of different things. I’ve used them for gifts, my favorite is to make a little church bag out of it, add tissues, gum, a scripture marker, etc. I’ve also used them as my everyday purse, and they hold up great, plus you can have one to match every outfit.

Some tips

  • place mats are inexpensive, so watch for them to go on clearance, at the end of each season.
  • My favorite place to buy placemats are places like Pier 1, Marshalls, TJMaxx, and even Target!
  • When you are buying a placemat for a purse, you want to keep it pretty thin and flexible, something that will go through your sewing machine easily.
  • Handles can be either ribbon or plastic. You can find handles at any craft store (look for coupons!). I like the cute bamboo ones, but ribbon works just as great, is less expensive and you can also embellish with it.
  • If you want to get fancy, you can add a snap or button closure…. Maybe not for beginners, but definitely easy and fun.

So, let’s get sewing!! This is the place mat I chose, it is from Macy's, cost 5$ and is a GREAT sturdy, well-made place mat. Plus I loved the colors!


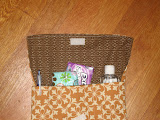
First, decide how you want your handles. And decide if you want any embellishments on your bag. We will sew both of these on first. After I laid it all out, I first sewed on the brown ribbon, just for an embellishment. Then I sewed on the little bow, and then started on the handles.


Here are the handles sewn on.....

Now, fold your bag inside out, or with RIGHT sides together. Line up the edges, and sew up the sides, about ½ inch from the outer edge. Don’t forget to back-stitch at the top where your bag will be opening a lot.

After the sides are sewn up, we're going to make square corners. It is easy, don’t get scared. Leave your bag inside out, hold your bag upside down and put your hand in so that your fingers (your 3rd finger) are in the corner. Now, with your other hand, pinch your bag on the seam so it makes a little triangle. Here is where you will sew; it makes it a little easier to sew if you push the seam open, like the picture below. Do the same on the other corner.


AND....fold your bag right side out, push out the corners, admire your work, and TA DA!!! You are done! Now, fill it with all sorts of goodies, post a picture and let us all admire your fabulous crafting!! We want to see everyone's unique styles and different ideas, so please post a picture of what you did!!

To see more examples from other contributors click here

2.04.2009

JELL-O Knox Blocks (Jigglers)

Ever since Thanksgiving we have been enthralled with Knox Blocks. I've also done it for preschool and I'm going to do it at our upcoming annual Valentine's Dress-to-Impress Kid's Dance Party! Each child gets to stamp out their own heart JELL-O jiggler. I love that they are mess free!! I also love to see how excited the kids get for them.

YOU NEED:
4 c. boiling water
9 oz. JELL-O (any flavor) p.s 9oz=3 small packages or 1 1/2 large packages
4 packages Knox-unflavored gelatine (1 box has 4 packages in it)

THEN:
Mix everything together slowly with a wire whisk. You can scoop out the bubbles if you want to...or not. Pour into 17x12x1 cookie sheet. I put the cookie sheet mostly into the fridge and then pour the liquid into it to avoid spilling it in transport. Chill until set--I always make it the night before. Let the kids cut out shapes with cookie cutters. Hint: Dip cookie cutter into water every so often to help with cutting. Finally, get ready for lots of smiles and laughter.

12.17.2008

Superman vs. Batman


Okay all you mommies, I completed a project and I'm so excited about it that I thought I would share it with you. From one mommy to another, I know you'll appreciate it. I saw this idea at a craft show and I thought to myself.... "I bet I could do that." So today, I did. I didn't use a pattern or anything, it was REALLY simple, but if you want some rough directions of what I did, let me know!

Basically I just picked out material, used fleece behind the logos, and felt for the logos. Then sewed ribbon on the top for the tie. I'm giving it to my 2 1/2 year old for Christmas, I think he'll like it, and then I can post pictures of my little man being a super hero!