


Well, if you are like me, you are always switching things from bag to bag. From the purse, to the church bag, to the smaller "date night" purse, etc. So, do you ever get sick of pulling all the loose odds and ends out of one bag and transfering them? Well, now you can put them all in one spot, and then all you have to move is this handy little pouch. I like to keep my essentials in here like: hand sanitizer, lip gloss, a pen, tissues, wipes, etc.
So, let's get started. Okay, first, pick your fabric and cut it to the size you want. What you want to make sure is that when you fold it about half way, that you have enough for a flap to make the closure.... does that make sense? sorry, I don't measure anything.
Here's my two pieces of fabric. The orange is going to be the front and the brown is the lining.
Step 1: sew right sides together, leaving the "top" open, as if you were making a pillow case.
 Here's my "pillow case" folded right side out, ready to fold up and sew again.
 Here's the other side.
 Step 2: fold it about half way up with "right sides" together again. Don't worry about the open top, we'll do that in a second.
 Step 3: Sew up the sides.
 Turn it right side out again, now you have your pouch, all is done except for the top raw edges.
 Now, it is going to seem weird, but we're going to sew on the "right" side to make some little pockets. Before you start sewing your pockets, sew on your velcro, it will be easier, I waited until I was done and it came out crooked, just check the photo.
 It's just straight lines, so don't get anxious. You can make as many pockets as big or small as you want. Here's a picture of my pockets, I made three (which means I sewed two lines).
 Then I sewed the top closed, I turned it under about 1/4 inch and sewed straight across. Then I sewed on the velcro..... pretend you don't see my crooked velcro, okay? See, I'm not a perfectionist!
 Then you can embellish the front or do whatever you want to your cute little carry-all. I love mine, it is so handy!
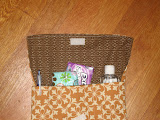
 And of course, lastly, fill it with all the goods, stick it in the purse or diaper bag and go!

 Then I sewed the top closed, I turned it under about 1/4 inch and sewed straight across. Then I sewed on the velcro..... pretend you don't see my crooked velcro, okay? See, I'm not a perfectionist!
 Then you can embellish the front or do whatever you want to your cute little carry-all. I love mine, it is so handy!
 And of course, lastly, fill it with all the goods, stick it in the purse or diaper bag and go!


9 comments:
That's such a great idea!
Very Cute Kara! Thanks for the great instructions! I can't wait to make one (or 10!)
This is a great idea. I have one for the diapers, etc but this would be a +great+ addition too. I agree with Shalee, it would be great to make more for gifts maybe. Thanks for the idea.
Kara! You are so good! I am impressed with how you balance everything, didn't you just move?? It is way cute! Keep them coming!
Yay! Thanks for the tutorial! I can't wait to make this!
I just finished mine!!
I'm from Ecuador, just got my sewing machine this christmas and this is the first craft I've done, thanks for the idea!!
Is there any way to post you the photo?
Happy 2011!!
Easy Peasy, This is one I can complete as a new sewer! Thanks for sharing! Hugs & Smiles, Dannette
Love this! I made it, I think I may make them for my son's teachers for Christmas this year!
This sounds like a great way to organize my essentials.
Post a Comment