


I always love finding a new approach on the handmade card. A friend taught me how to make these cool accordion book/cards last year. They're perfect for any occasion, but I thought they would make extra-special valentines. This year I am making one for my husband and each of my kiddos. My printer won't cooperate so I haven't been able to finish them, but I wanted to get this posted so you had a chance to make one before V-Day. I included pictures of three I made last year for my sisters and sister-in-law. (See bottom of post)
I am often found two steps behind the rest of the group, so hopefully you have not already made this ages ago in Homemaking meetings across the globe.
Don't mind all the pictures. Maybe you're like me and more of a visual learner. In that case: You're welcome! Ü
To make one accordion book/card you will need:
3 pages of 8.5 x 11 card stock
1 piece of cardboard (you could cut up a box)
1 page of patterned paper (12 x 12 sheet)
ribbon
your preferred crafting glue (I use a glue stick)
a glue gun and glue sticks
scissors or paper cutter
additional craft supplies you want to use to personalize the middle
Optional: clear tape

Cut all three pieces of card stock into perfect squares (8.5 x 8.5).

Fold square in half. Make the fold sharp, precise, and defined. Fold it back and forth a couple of times to make it flexible. (Take your time with ALL the folds. Be careful and precise. It's not difficult; it just needs careful attention.)

Unfold paper, rotate, and fold in half again so that you will have perpendicular folds that will divide your square into four equal squares. Again, make your folds sharp and defined.


Fold your square diagonally into a triangle. Just as before, make sure folds are defined. ONLY FOLD ONE DIAGONAL FOLD. DO NOT ROTATE AND FOLD IN A TRIANGLE AGAIN.


Bring opposite corners that have been folded in triangle (If you look at the above picture, it's the bottom left and top right corners) together. Allow them to collapse so that the two squares that were NOT folded in the triangle sandwich them.

Repeat these steps so that all three pieces of card stock are exactly alike.
Unfold papers and lay them together as show in the picture below. Place the middle paper on top of the others. Match up the squares as perfectly as possible and use a glue stick to secure in place. Be generous with gluing. These pieces are going to move often and you want them to be secure.

Now you have the accordion part of your book! You may have to play with it a bit to figure out how it collapses and expands.

If you folded things right, your accordion book should have 4.25 inch squares.
Next you will make the cardboard covers. Cut two 4.5 x 4.5 inch squares out of cardboard.

Now take your patterned paper and cut out two 6 inch squares to cover the cardboard.

Next you will secure the patterned paper to the cardboard. I like to use my glue gun for this. Glue sticks just aren't up to the task. Hint: Fold the paper on like you are wrapping a gift, dotting hot glue along as you do.

Although they should be square and not really matter which way is up, I like to draw arrows on the side that will be glued on the card stock just to help my scatterbrained nature.
Before you glue the covers onto the innards you need to glue on ribbon pieces. The ribbon will be used to tie around the finished book to keep it from falling open. There is probably a better way to do it than the way I do it, but all I know is what I know, so here is my technique.
I glue two separate lengths of ribbon onto the top and bottom of the cardboard cover that will sit on the top of the book. (Another reason I put arrow markers on there.)
Hint: You could use tape to temporarily secure your ribbon and see how it works for you. (If you are having trouble figuring out how to piece the three pieces of card stock together to make the accordion, you could also use tape to figure out the mechanics of it before committing to glue.)

Below is the front of the book with the ribbon wrapped down and around the back and tied in front.
Hint: I used a lighter to melt the ends of my ribbon so as to prevent fraying. Works like a charm!

This is the back of the book with the ribbon wrapped around.

Now I use my handy-dandy glue gun again to secure the card stock innards to the covers. Work quickly, but make sure you are aligning your squares neatly AND securely.
You could glue your innards on however you want, but I like to do so that when I unfold it, it lifts from the bottom right corner and expands up and to the left. Did I confuse you more by adding that?? Sorry if I did!

The semi-finished result! (I just realized that my book is technically upside-down in the pictures above and below...Disregard that. According to the directions I've given you, the ribboned cover would have been on the top. You may not have even noticed; I'm just telling you in case you had and were confused that my picture looked different than what the instructions had dictated. SORRY!)

Now, you can fill the innards to your heart's content! Go crazy! Use pictures, quotes, accessories, flowers...the sky is the limit! The book has some give when folded up so don't worry too much about making it "too" thick.
JUST REMEMBER, THE FOLDS FOLD WHEN IT IS COLLAPSED SO DON'T GLUE THINGS OVER THE FOLDS. You can cut pictures in half or place words around the fold.
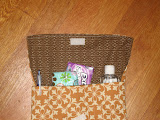
Again...Sorry I don't have this one finished to show you, but here are some pictures of others I made (I think it was for Mother's Day...). Click on pictures to zoom in.


Hopefully, between pictures and instructions you can figure out how to make this great accordion book/card. If you have any questions, put it in the comments, and I will do my best to answer it.
And let us know how yours turned out! Send me your pictures at claytonevelyn@gmail.com and I will post them or post it on your blog and leave a comment with the link!
Happy crafting and HAPPY VALENTINE'S DAY! ♥♥♥


3 comments:
Super cute! thanks for the instructions, I've always wondered how people put those together!
This so so cool, I've always wanted to make one of these. Bookmarking this page for later!!
Thanks!!
Post a Comment